客户端创建公钥,加入到服务器的authorized_keys中
我们通常使用Ubuntu系统远程登陆时,一般使用 PASSWORD【用户名+密码】 的方式进行验证登陆,但是这种方式在使用的过程中需要频繁的输入用户名和密码,显得很繁琐,我们可以更具安全性的RSA密钥认证来避免这种登陆方式。
继续阅读“Linux系统使用SSH免密码登陆”
xuenhua’s 站点

客户端创建公钥,加入到服务器的authorized_keys中
我们通常使用Ubuntu系统远程登陆时,一般使用 PASSWORD【用户名+密码】 的方式进行验证登陆,但是这种方式在使用的过程中需要频繁的输入用户名和密码,显得很繁琐,我们可以更具安全性的RSA密钥认证来避免这种登陆方式。
继续阅读“Linux系统使用SSH免密码登陆”我们知道Linux、Unix系统中文件都是有权限属性的,如rwx权限等等,这些权限属性存在何处呢?单独存放一个表格?还是这些属性存在文件本身上?如果是通过表格或者数据库管理起来会很麻烦,如果是在文件上,那么文件复制到其他机器属性还在吗?
一、inode是什么?
理解inode,要从文件储存说起。
文件储存在硬盘上,硬盘的最小存储单位叫做”扇区”(Sector)。每个扇区储存512字节(相当于0.5KB)。
操作系统读取硬盘的时候,不会一个个扇区地读取,这样效率太低,而是一次性连续读取多个扇区,即一次性读取一个”块”(block)。这种由多个扇区组成的”块”,是文件存取的最小单位。”块”的大小,最常见的是4KB,即连续八个 sector组成一个 block。
文件数据都储存在”块”中,那么很显然,我们还必须找到一个地方储存文件的元信息,比如文件的创建者、文件的创建日期、文件的大小等等。这种储存文件元信息的区域就叫做inode,中文译名为”索引节点”。
每一个文件都有对应的inode,里面包含了与该文件有关的一些信息。
二、inode的内容
inode包含文件的元信息,具体来说有以下内容:
* 文件的字节数
* 文件拥有者的User ID
* 文件的Group ID
* 文件的读、写、执行权限
* 文件的时间戳,共有三个:ctime指inode上一次变动的时间,mtime指文件内容上一次变动的时间,atime指文件上一次打开的时间。
* 链接数,即有多少文件名指向这个inode
* 文件数据block的位置
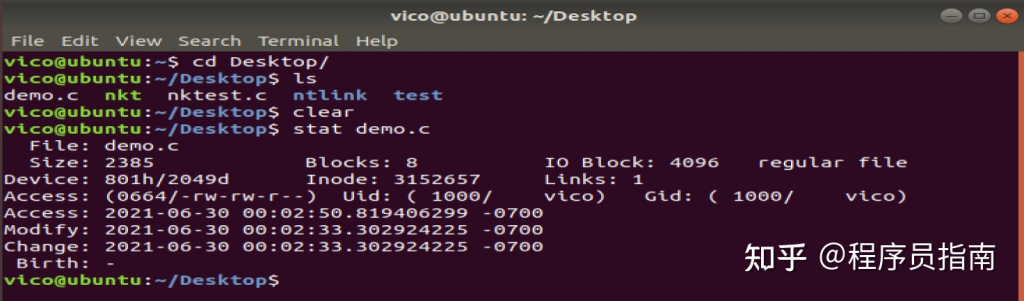
可以用stat命令,查看某个文件的inode信息:

总之,除了文件名以外的所有文件信息,都存在inode之中。至于为什么没有文件名,下文会有详细解释。
三、inode的大小
inode也会消耗硬盘空间,所以硬盘格式化的时候,操作系统自动将硬盘分成两个区域。一个是数据区,存放文件数据;另一个是inode区(inode table),存放inode所包含的信息。
每个inode节点的大小,一般是128字节或256字节。inode节点的总数,在格式化时就给定,一般是每1KB或每2KB就设置一个inode。假定在一块1GB的硬盘中,每个inode节点的大小为128字节,每1KB就设置一个inode,那么inode table的大小就会达到128MB,占整块硬盘的12.8%。
查看每个硬盘分区的inode总数和已经使用的数量,可以使用df命令。

查看每个inode节点的大小,可以用如下命令:
sudo dumpe2fs -h /dev/sda1 | grep “Inode size”

由于每个文件都必须有一个inode,因此有可能发生inode已经用光,但是硬盘还未存满的情况。这时,就无法在硬盘上创建新文件。
四、inode号码
每个inode都有一个号码,操作系统用inode号码来识别不同的文件。
这里值得重复一遍,Unix/Linux系统内部不使用文件名,而使用inode号码来识别文件。对于系统来说,文件名只是inode号码便于识别的别称或者绰号。
表面上,用户通过文件名,打开文件。实际上,系统内部这个过程分成三步:首先,系统找到这个文件名对应的inode号码;其次,通过inode号码,获取inode信息;最后,根据inode信息,找到文件数据所在的block,读出数据。
使用ls -i命令,可以看到文件名对应的inode号码:

五、目录文件
Unix/Linux系统中,目录(directory)也是一种文件。打开目录,实际上就是打开目录文件。
目录文件的结构非常简单,就是一系列目录项(dirent)的列表。每个目录项,由两部分组成:所包含文件的文件名,以及该文件名对应的inode号码。
ls命令只列出目录文件中的所有文件名:
ls /etc/

ls -i命令列出整个目录文件,即文件名和inode号码:
ls -i /etc/
如果要查看文件的详细信息,就必须根据inode号码,访问inode节点,读取信息。ls -l命令列出文件的详细信息。
ls -l /etc/

六、硬链接
一般情况下,文件名和inode号码是”一一对应”关系,每个inode号码对应一个文件名。但是,Unix/Linux系统允许,多个文件名指向同一个inode号码。
这意味着,可以用不同的文件名访问同样的内容;对文件内容进行修改,会影响到所有文件名;但是,删除一个文件名,不影响另一个文件名的访问。这种情况就被称为”硬链接”(hard link)。
ln命令可以创建硬链接:
ln 源文件 目标文件
运行上面这条命令以后,源文件与目标文件的inode号码相同,都指向同一个inode。inode信息中有一项叫做”链接数”,记录指向该inode的文件名总数,这时就会增加1。
反过来,删除一个文件名,就会使得inode节点中的”链接数”减1。当这个值减到0,表明没有文件名指向这个inode,系统就会回收这个inode号码,以及其所对应block区域。
这里顺便说一下目录文件的”链接数”。创建目录时,默认会生成两个目录项:”.”和”..”。前者的inode号码就是当前目录的inode号码,等同于当前目录的”硬链接”;后者的inode号码就是当前目录的父目录的inode号码,等同于父目录的”硬链接”。所以,任何一个目录的”硬链接”总数,总是等于2加上它的子目录总数(含隐藏目录)。
七、软链接
除了硬链接以外,还有一种特殊情况。
文件A和文件B的inode号码虽然不一样,但是文件A的内容是文件B的路径。读取文件A时,系统会自动将访问者导向文件B。因此,无论打开哪一个文件,最终读取的都是文件B。这时,文件A就称为文件B的”软链接”(soft link)或者”符号链接(symbolic link)。
这意味着,文件A依赖于文件B而存在,如果删除了文件B,打开文件A就会报错:”No such file or directory”。这是软链接与硬链接最大的不同:文件A指向文件B的文件名,而不是文件B的inode号码,文件B的inode”链接数”不会因此发生变化。
ln -s命令可以创建软链接。
ln -s 源文文件或目录 目标文件或目录
八、inode的特殊作用
由于inode号码与文件名分离,这种机制导致了一些Unix/Linux系统特有的现象。
1. 有时,文件名包含特殊字符,无法正常删除。这时,直接删除inode节点,就能起到删除文件的作用。
2. 移动文件或重命名文件,只是改变文件名,不影响inode号码。
3. 打开一个文件以后,系统就以inode号码来识别这个文件,不再考虑文件名。因此,通常来说,系统无法从inode号码得知文件名。
第3点使得软件更新变得简单,可以在不关闭软件的情况下进行更新,不需要重启。因为系统通过inode号码,识别运行中的文件,不通过文件名。更新的时候,新版文件以同样的文件名,生成一个新的inode,不会影响到运行中的文件。等到下一次运行这个软件的时候,文件名就自动指向新版文件,旧版文件的inode则被回收。
九、拓展软硬链接
1、硬链接
硬链接是通过索引节点进行的链接。在Linux中,多个文件指向同一个索引节点是允许的,像这样的链接就是硬链接。硬链接只能在同一文件系统中的文件之间进行链接,不能对目录进行创建。如果删除硬链接对应的源文件,则硬链接文件仍然存在,而且保存了原有的内容,这样可以起到防止因为误操作而错误删除文件的作用。由于硬链接是有着相同 inode 号仅文件名不同的文件,因此,删除一个硬链接文件并不影响其他有相同 inode 号的文件。
2、软链接
软链接(也叫符号链接)与硬链接不同,文件用户数据块中存放的内容是另一文件的路径名的指向。软链接就是一个普通文件,只是数据块内容有点特殊。软链接可对文件或目录创建。
软链接主要应用于以下两个方面:一是方便管理,例如可以把一个复杂路径下的文件链接到一个简单路径下方便用户访问;另一方面就是解决文件系统磁盘空间不足的情况。例如某个文件文件系统空间已经用完了,但是现在必须在该文件系统下创建一个新的目录并存储大量的文件,那么可以把另一个剩余空间较多的文件系统中的目录链接到该文件系统中,这样就可以很好的解决空间不足问题。删除软链接并不影响被指向的文件,但若被指向的原文件被删除,则相关软连接就变成了死链接。
此处将8080转到80端口,9000转到90
sudo iptables -t nat -I PREROUTING -p udp –dport 80 -j REDIRECT –to-ports 8080
sudo iptables -t nat -I PREROUTING -p udp –dport 90 -j REDIRECT –to-ports 9000
sudo iptables -L -n -t nat –line-number
Chain PREROUTING (policy ACCEPT)
num target prot opt source destination
1 REDIRECT 17 — 0.0.0.0/0 0.0.0.0/0 udp dpt:90 redir ports 9000
2 REDIRECT 17 — 0.0.0.0/0 0.0.0.0/0 udp dpt:80 redir ports 8080
Chain INPUT (policy ACCEPT)
num target prot opt source destination
#删除PREROUTING的第二条已添加规则,这里2代表第几行规则
#PREROUTING 对应 Chain类型,上面2标黄部分
sudo iptables -D PREROUTING 2
Vim 是 Vi 多模式命令行编辑器的加强版,通常默认的Unix或Linux系统中都默认自带Vi命令编辑器。当然,为了更好的体验,如果系统默认没有安装Vim,建议安装Vim。
通过本文的讲解,你将学会如何在Vim/Vi中快速的使用命令进行查找替换文本。
基础的查找和替换
首先,启动Vim/Vi编辑器,处于正常模式下。如果你不确定是否处于正常模式下,这时你可以按“ESC”,编辑器就会进入正常模式。
替换命令的格式一般如下:
:[range]s/{pattern}/{string}/[flags] [count]
该命令表示在[range]的每一行中搜索{pattern},并将其替换为{string}。 [count]是一个乘以命令的正整数。
如果没有给出[range]和[count],则仅替换当前行中找到的模式。
例如,要搜索当前行中字符串“foo”的首次出现,并将其替换为“bar”,可以使用:
:s/foo/bar/
要替换当前行中搜索到的所有内容,可以添加g标志:
:s/foo/bar/g
如果想搜索和替换整个文件中的匹配内容,使用百分比字符%作为范围。此字符指示从文件第一行到最后一行的范围:
:%s/foo/bar/g
如果省略{string}部分即上面的bar,则将其视为空字符串,相当于将匹配到的内容替换为空,既删除匹配到的内容。
以下命令删除当前行中字符串“foo”的所有实例:
:s/foo//g
当然,除了作为分隔符外,还可以使用任何其他非字母数字单字节字符,而不是斜杠字符(/)。例如:
:s|foo|bar|
要确认每个替换,可以使用c标志。
:s/foo/bar/gc
替换前会询问:
replace with bar (y/n/a/q/l/^E/^Y)?
按y替换匹配项,或按l替换匹配项并退出。 按n跳过当前匹配,按q或Esc退出替换。 a选项替换匹配项和所有剩余匹配项。
若要向下滚动屏幕,请使用CTRL + Y,向上滚动,请使用CTRL + E。
还可以使用正则表达式作为搜索模式,例如:
:%s/^foo.*/Vim is the best/gc
^ 符号表示与行首匹配,.* 表示匹配任意数量的字符。
区分大小写
默认情况下,搜索操作区分大小写;搜索“FOO”将与“FOo”不匹配。
要忽略搜索模式的案例,请使用i标志:
:s/Foo/bar/gi
另一种强制忽略案例的方法是在搜索模式后添加\c。例如,/Linux\c执行忽略大小写搜索。
:s/Foo\c/bar/g
查询范围
当未指定范围时,替换命令仅在当前行中操作。
范围可以是一行,也可以是两行之间的范围。 行说明符之间可用英文,分隔;字符分割。 可以使用绝对行号或特殊符号指定范围。
例如,要在从第3行到第10行的所有行中将所有出现的“ foo”替换为“ bar”,可以使用:
:3,10s/foo/bar/g
该范围是包含范围的,这意味着该范围包括第一行和最后一行。
. 字符表示当前行,$美元符号表示最后一行。 要在从当前行到最后一行的所有行中替换“ foo”:
:.,$s/foo/bar/
也可以使用“ +”或“-”符号来设置行说明符,其后是从前一个行号添加或减去的数字。 如果省略符号后的数字,则默认为1。
例如,从当前行和接下来的四行开始,用“ bar”替换每个“ foo”,键入:
:.,+4s/foo/bar/g
替换整个单词
替代命令将模式作为字符串而不是整个单词查找。 例如,如果您正在搜索“ gnu”,则搜索查找匹配“ gnu”嵌入在较大单词(例如“cygnus” 或 “magnum”)中的情况。
要搜索整个单词,请键入\ <标记单词的开头,输入搜索模式,键入>标记单词的结尾:
例如,要搜索单词“ foo”,可以使用\<foo\>:
:s/\<foo\>/bar/
替代历史
Vim会跟踪您在当前会话中运行的所有命令。
要浏览历史记录以查找先前的替代命令,请输入:s并使用向上或向下箭头键查找先前的替代操作。 要运行该命令,只需按Enter。 您也可以在执行操作之前编辑命令。
例子
注释行(在行前添加#)从5到20:
:5,20s/^/#/
取消注释行从5到20,恢复以前的更改:
:5,20s/^#//
将“苹果”,“橙色”和“芒果”的所有实例替换为“水果”:
:%s/apple\|orange\|mango/fruit/g
删除每行末尾的空格:
:%s/\s\+$//e
写在最后
搜索和替换在Vim中是一个非常强大的功能,学会使用它能使您可以快速更改文本,提高自己的工作效率。
1. vi /etc/rc.local 增加java环境变量,否则javahome未加载
touch /var/lock/subsys/local
export JAVA_HOME=/home/jdk1.7.0_80
export PATH=$JAVA_HOME/bin:$PATH
export CLASSPATH=.:$JAVA_HOME/lib/dt.jar:$JAVA_HOME/lib/tools.jar
export JRE_HOME=$JAVA_HOME/jre
# 以特定用户执行
su abc -c “/bin/bash /home/abc/autoStartTomcat.sh”
#!/bin/sh
echo “启动”;
cd /home/abc/apache-tomcat-7.0.94/bin;
./startup.sh;
echo “启动接口”;
cd /home/abc/apache-tomcat-8.5.43-Interface_3396/bin;
./startup.sh;
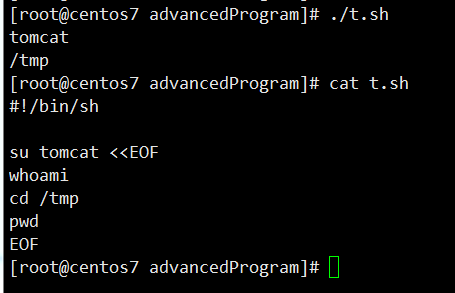
su abc << EOF
Whoami
cd /home/
pwd
EOF
执行结果
abc
/home
首先注意usr 指 Unix System Resource,而不是User
然后通常:
/usr/bin下面的都是系统预装的可执行程序,会随着系统升级而改变。
/usr/local/bin目录是给用户放置自己的可执行程序的地方,推荐放在这里,不会被系统升级而覆盖同名文件。
如果两个目录下有相同的可执行程序,谁优先执行受到PATH环境变量的影响,比如我的一台服务器的PATH变量为。
echo $PATH
/usr/local/bin:/usr/bin:/bin:/usr/sbin:/sbin
/usr/lib64/qt-3.3/bin:/usr/local/bin:/bin:/usr/bin:/usr/local/sbin:/usr/sbin:/sbin:/home/dean/bin
这里/usr/local/bin优先于/usr/bin, 一般都是如此。

/var目录下一般为所有服务的登录的文件或错误信息文件与一些数据库等。
例如:/var/log/boot.log 为系统引导文件;/var/log/messages 为系统报错日志; /var/log/maillog 为邮箱系统日志。
/bin是系统的一些指令。bin为binary的简写主要放置一些系统的必备执行档例如:cat、cp、chmod df、dmesg、gzip、kill、ls、mkdir、more、mount、rm、su、tar等。
/sbin一般是指超级用户指令。主要放置一些系统管理的必备程式例如:cfdisk、dhcpcd、dump、e2fsck、fdisk、halt、ifconfig、ifup、 ifdown、init、insmod、lilo、lsmod、mke2fs、modprobe、quotacheck、reboot、rmmod、 runlevel、shutdown等。
/usr/bin是你在后期安装的一些软件的运行脚本。主要放置一些应用软体工具的必备执行档例如c++、g++、gcc、chdrv、diff、dig、du、eject、elm、free、gnome*、 gzip、htpasswd、kfm、ktop、last、less、locale、m4、make、man、mcopy、ncftp、 newaliases、nslookup passwd、quota、smb*、wget等。